Friday, June 6, 2014

Procure to Pay (P2P) Function and Technical Flow


Diagrammatic representation of Procure to Pay cycle.


First let’s see what the heading itself means? Procure to Pay means Procuring Raw Materials required to manufacture the final or finished Goods to Paying the Supplier from whom the material was purchased. But this is not just two steps. It involves many steps. Let’s see the steps and Oracle Application involved in performing those steps.
  1. Oracle Purchasing: You enter Suppliers of different materials and products you want to purchase to manufacture a finished good that your organization plans to sell.
  2. Oracle Purchasing: You prepare a Request for Quotation (RFQ) and send it to different suppliers to get the best and/or economical price for the product.
  3. Oracle Purchasing: Suppliers sends their quotations and you upload those quotations in Oracle Purchasing to get the best three quotes and further to get the one best quote.
  4. Oracle Purchasing: You prepare a Purchase Order(PO) against the best RFQ to buy the goods from the supplier who quoted the suitable price and sends the PO to that supplier
  5. Oracle Purchasing: The supplier receives the confirmation of purchase from PO and ships the ordered goods. You receive the goods enter aGoods Received Note (GRN) in Oracle Purchasing.
  6. Oracle Inventory / Oracle Assets: It’s up to you whether you want to receive the goods at your head office or you Inventory directly. In either case you move the received goods to your different Raw Material Inventory from Oracle Purchasing to Oracle Inventory and the Item Count increases. If the item is Asset Type then it will move to Oracle Assets at the time of Invoice creation in Oracle Payables.
  7. Oracle General Ledger: Once you move the goods to Oracle Inventory, it sends the Material Accounting to Oracle General Ledger.
  8. Oracle Payables: After this the supplier sends you the invoice for the purchased goods and you Enter or Match the invoice against the PO from Oracle Purchasing in Oracle Payables. As said before, if the item is Asset in nature then it will move to Oracle Asset.
  9. Oracle General Ledger: When you enter the invoice it means that you have created a Liability against that supplier and also you have recorded the expense incurred or asset purchased. Oracle Payables sends the invoice accounting to Oracle General Ledger.
  10. Oracle Payables: You pay the invoice and settle the Liability.
  11. Oracle General Ledger: The liability is settled and your cash movement account is updated.
  12. Oracle Cash Management: As you pay the invoice Oracle Payables sends the payment information to Oracle Cash Management for Bank Reconciliation. Once reconciled, Oracle Cash Management sends the updated Bank/Cash accounting entry to Oracle General Ledger.
  13. Oracle General Ledger: Your cash at bank is updated with actual balance.
  14. Oracle Process Manufacturing(OPM) / Oracle Discrete Manufacturing(ODM): You start the manufacturing of your final product. Both OPM or ODM requests the different raw materials from your inventory organizations and manufactures a finished good.
  15. Oracle Inventory: As the raw materials are issued to OPM and ODM the inventory sends the issuing material accounting to General Ledger and decreases the Item Count from the Raw Material Store. As the finished good is prepared, Oracle Inventory receives the finished good in Finished Good Store and increase the Item Count. 
Now the final product is ready to be sold in the market.

Oracle Procure to Pay Functional Flow

Stage 1: Choosing an Item

Let us choose an item to be procured in our example. 
Go to Purchasing Responsibility and follow the below navigation to check for the suitable item.


The item picked for our example should be purchasable item as above. Click on tools and choose “Categories” to view the below screen.


Stage 2: Creation of Requisition

Follow the below Navigation to reach Requisition Form. 


Create a new Requisition for the item viewed in Stage 1.


Click on Distributions to View the charge Account.
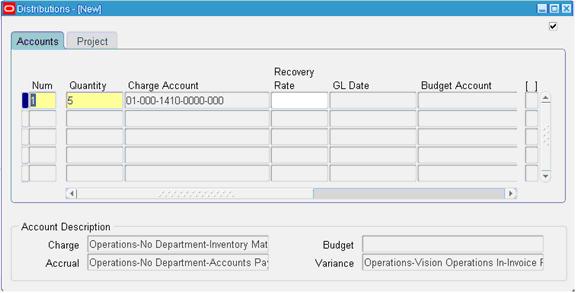
 

Save and Submit for Approval


Now note down the Requisition number and open the “Requisition Summary Form” to view the status of it. For our Example, Requisition number is: 14855

Stage 3 : Checking the Status of Requisition


 Query for the Requisition Number and click Find.


 Here for our example purpose, I kept the submitted and approved person has same and hence it shows the status as approved.


 To see the approval status, please follow the below navigation. 


Stage 4 : Creation of Purchase Order

For creating a Purchase order, let us use the “Autocreate Documents” Form. Follow the below Navigation

 Query for the Requisition
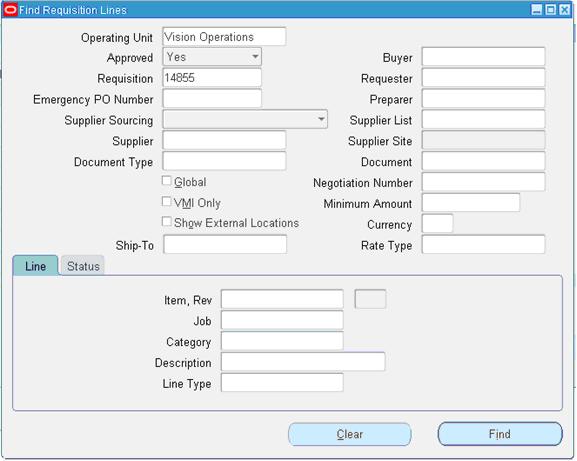

 Click on Automatic as shown in the above figure to create a Purchase Order

  
Click on “Create” button to create a Purchase order


 View the shipment screen to change the “Match Approval Level” to “2-Way”.

Click the “Receiving Controls” to make sure that the “Routing” is made as “Direct Routing”


 Click Save and submit for Approval.


 Note down the PO Number.
  
Stage 5: Creation of Receipts


Query with the Purchase order created in the above stage.


 Check the check box near to the lines that are received and click save.

  
Click the “Header Button” to view the Receipt Number.


Stage 6: Checking the On Hand

 Go to any Inventory Responsibility and follow the below Navigation


 Query for our Receipt and make sure the Organization is the same as we received.


 Below screen will show that our inventory has been increased by 5 quantities.


Stage 7: Check the Material Transactions

Follow the below Navigation to reach “Material Transactions” Form

 Query for the item and date as below


 Below screen shows the source and transaction Type

 Below screen shows you the Serial Numbers of the items received.

  
Stage 8: Creation of Invoice

Navigate to any Purchasing Responsibility and view Ã  Requests 
Submit the below requests by providing the Receipt number as Parameter to create an invoice.


 Check the status of the program.


Stage 9: Checking the Invoice

Change to any Payables Responsibility and open the invoices Form.

Query for the Purchase order as below,


 Click “Actions” Button then tick the “Validate Check Box” and press “Ok” to validate the invoice

  
Below screenshot will give you the status of the invoice

  
Stage 10: Creation of Accounting and Payment

Once invoice got approved, we can “Create Accounting” and “Create Payments” via “Action” Button in the “Invoice Form” as we validated the invoice.


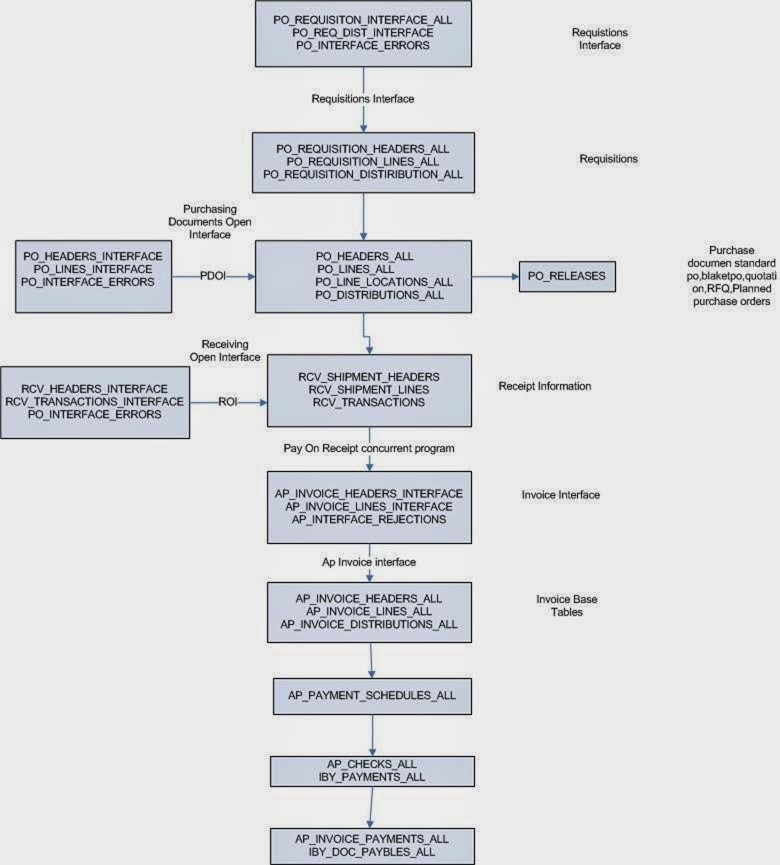
Oracle Procure to Pay Technical Flow


Monday, March 31, 2014

Difference between Org_id ,organization_id and operating_unit

For instance let us say you are having Inventory Store.
You have Inventory Stores in two different countries like India and USA
You have installed Oracle Apps single instance and entered all the suppliers information,customers data,tax rules etc.

And your business requirement is like this, all the rules and the data corresponding to indian store shouldnt be applicable/available to american store and vice versa.

So to meet the above requirements you will define two operating units one for india and one for USA.
Now each operating unit will have an ID known as ORG ID.

And we use ORG ID to secure our business data.

Now to do transactions for indian operations you need to define one responsibility and attach indian ORG ID to this responsibility.By this an indian will not see any data/rules applicable to USA.

Similarly you will define another responsibility for USA and attach USA's ORG ID to this responsibility so that an american will not see any data/rules corresponding to India.

This is the concept of ORG ID.

Now let us see what is Organization ID.

Within India you have got various branches in different parts of the country in different states like AP,UP,MP etc.
And the business requirement is like this in AP you will maintain stock of Rice,UP for Wheat and MP for Maize.
To meet this business requirement you will define 3 Inventory Organizations under Indian Operating Unit to maintain the respective stocks of the states..

Each Inventory Organization will have an Organization ID.

This is the outline of the differences between ORG ID and Organization ID.

Thursday, July 25, 2013

Simple Steps to Find Password for an Application User in Oracle Applications

Step 1. Create get_password package specification, as shown below.

CREATE OR REPLACE PACKAGE get_password
AS
   FUNCTION decrypt (KEY IN VARCHAR2, VALUE IN VARCHAR2)
      RETURN VARCHAR2;
END get_password;
/

Step 2. Create get_pwd package body, as shown below.


CREATE OR REPLACE PACKAGE BODY get_password
AS
   FUNCTION decrypt (
      KEY     IN VARCHAR2
    , VALUE   IN VARCHAR2)
      RETURN VARCHAR2
   AS
      LANGUAGE JAVA
      NAME 'oracle.apps.fnd.security.WebSessionManagerProc.decrypt(java.lang.String,java.lang.String) return java.lang.String';
END get_password;
/

Step 3. Query to get password for apps user.


SELECT (SELECT get_password.decrypt (
                  UPPER (
                     (SELECT UPPER (fnd_profile.VALUE ('GUEST_USER_PWD'))
                        FROM DUAL))
                , usertable.encrypted_foundation_password)
          FROM DUAL)
          AS apps_password
  FROM fnd_user usertable
 WHERE usertable.user_name LIKE
          UPPER (
             (SELECT SUBSTR (
                        fnd_profile.VALUE ('GUEST_USER_PWD')
                      , 1
                      , INSTR (fnd_profile.VALUE ('GUEST_USER_PWD'), '/') - 1)
                FROM DUAL));

Step 4. Query to get password for any application user.


SELECT usertable.user_name
     , (SELECT get_password.decrypt (
                  UPPER (
                     (SELECT (SELECT get_password.decrypt (
                                        UPPER (
                                           (SELECT UPPER (
                                                      fnd_profile.VALUE (
                                                         'GUEST_USER_PWD'))
                                              FROM DUAL))
                                      , usertable.encrypted_foundation_password)
                                FROM DUAL)
                                AS apps_password
                        FROM fnd_user usertable
                       WHERE usertable.user_name LIKE
                                UPPER (
                                   (SELECT SUBSTR (
                                              fnd_profile.VALUE (
                                                 'GUEST_USER_PWD')
                                            , 1
                                            ,   INSTR (
                                                   fnd_profile.VALUE (
                                                      'GUEST_USER_PWD')
                                                 , '/')
                                              - 1)
                                      FROM DUAL))))
                , usertable.encrypted_user_password)
          FROM DUAL)
          AS encrypted_user_password
  FROM fnd_user usertable
 WHERE usertable.user_name LIKE UPPER ('&username');

Saturday, May 4, 2013

How to block YOUKU ads


Recently Youku advertising began rounds, the Adblock Plus looks like a bar can not afford to, do not worry there are ways, as shown below
Step 1 :
1)Go to C:\Windows\System32\drivers\etc
2)open hosts File.
3)Add the below ipaddress to it.
127.0.0.1 atm.youku.com
127.0.0.1 Fvid.atm.youku.com
127.0.0.1 html.atm.youku.com
127.0.0.1 valb.atm.youku.com
127.0.0.1 valf.atm.youku.com
127.0.0.1 valo.atm.youku.com
127.0.0.1 valp.atm.youku.com
127.0.0.1 lstat.youku.com
127.0.0.1 speed.lstat.youku.com
127.0.0.1 urchin.lstat.youku.com
127.0.0.1 stat.youku.com
127.0.0.1 static.lstat.youku.com
127.0.0.1 valc.atm.youku.com
127.0.0.1 vid.atm.youku.com
127.0.0.1 walp.atm.youku.com
Step 2:
Follow the path to find static.youku.com folder, then delete the folder, create a new txt file, named static.youku.com (wood suffix, pay attention!), And then set to read-only and then theoretically fly
C: \ Users \ mufeng \ AppData \ Local \ Google \ Chrome \ User Data \ Default \ Pepper Data \ Shockwave Flash \ WritableRoot \ # SharedObjects \ LPT6CBCC

youku.jpg

Tuesday, April 23, 2013

Validate or change Oracle Apps username and password


This script can be used for troubleshooting. In Oracle Applications there are two kinds of users -- the Oracle user and application user. The Oracle user password can be verified by direct login. But the applications login can't be directly verified by Oracle (SQLPlus) login. This is not possible because the application user is not created on the Oracle level or by login on self-service. You first have to verify that the guest password is good (it should match DBC file entry). This script will verify that. It has been tested in 11.5.7 and 8.1.7.4.
When running the following script, return Y password is correct. Otherwise change it to Using FNDCPASS.

Note: GUEST/ORACLE is defalt username/PASSWD
Sqlplus apps/apps select fnd_web_sec.validate_login('GUEST','ORACLE') from dual; exit  
Change applications user password: This example shows how to change sysadmin user password.
FNDCPASS apps/apps 0 Y system/manager USER SYSADMIN WELCOME

Friday, April 19, 2013

How to remove lock on a table. ERROR at line 1: ORA-00031: session marked for kill;


Problem Description: DBA wanted to kill a long running oracle job/process and he issued ALTER SYSTEM KILL SESSION ‘SID, serial#’ command. DBA got a message ORA-00031: session marked for kill. But, after killing the job, still he is not able to modify the table which was involved in the job or not able to add an index to the table. When he tries do perform any kind DDL change on the table, getting resource busy and acquire with NOWAIT error message.
Session cannot be killed immediate because the session is involved in a non-interruptible operation. Example, the transaction is getting rolled back or being blocked by a network operation.

Why Session Marked for Kill?

 I have a transaction table of 10 million records and I started batch job which update/manipulate the transaction table. The batch process takes 1hour and due to some reason I had to kill the job. I issued ALTER SYSTEM KILL SESSION ‘SID, serial#’ and I got a message ORA-00031: session marked for kill. Normally, huge table manipulation transactions required lot of oracle resources like redo to be used and in the middle of the transaction if you try to kill the process, oracle will take its own time to roll back the transaction. In such situations you get ORA-00031: session marked for kill message and in the background the rollback will start by oracle. The speed of the transaction rollback again depends on the system resources. Until the transaction fully get rolled back the status of the particular session in v$session dictionary view would be KILLED but the table will be locked by the killed session. If you try to do any kind of DDL operation on this table from different session you will get resource busy and acquire with NOWAIT message.

How to Monitor the Transaction Rollback?

Suppose I have session running with sid 14 and serial#787 with and data purge delete on the transaction table with 10million records.

To monitor the undo generated from v$transaction table. Please find the below mentioned query.

SQL> select used_ublk from v$transaction;

 USED_UBLK
----------
      5650

1 row selected.

It means, these much undo is generated.

I am going to kill the session using alter system kill session command.

SQL>alter system kill session '13,787';
Alter system kill session '13,787'
*
ERROR at line 1:
ORA-00031: session marked for kill

SQL> select username, status from v$session where sid=13;

SID                  STATUS
-------------------- ----------
13                   KILLED

1 row selected.

Again if you check the v$transaction table you can see the difference in value

SQL> select used_ublk from v$transaction;

 USED_UBLK
----------
      5298

1 row selected.

SQL> /

 USED_UBLK
----------
      4302

1 row selected.

SQL> select username, status from v$session where sid=13;

SID                  STATUS
-------------------- ----------
13                   KILLED

1 row selected.

SQL> select used_ublk from v$transaction;

 USED_UBLK
----------
      1349
SQL> /

 USED_UBLK
----------
     502


One thing we can notice that the used_ublk is coming down and the v$session status remains as KILLED.
SQL> /

no rows selected

This means the oracle finished it rolling back activity.

SQL> select username, status from v$session where sid=13;

no rows selected

This means the session removed from v$session view after the full rollback of the transaction.

Manual steps to release the lock on the table
In some cases the rolling back process will take long time may be for hours. In such situations if you wanted to perform any kind of update/insert /DDLs the table will not allow due to the lock by the killed session. You will get an error message says ORA-00054 resource busy and acquired with NOWAIT specified. In case if you don’t want to wait for long time until the rollback completes, there are some workaround to terminate the lock by killing process from OS side. You can use kill (UNIX) ORAKILL (WINDOWS) to terminate the process. This is not recommended.

UNIX

Select   p.spid from v$session s , v$process p
where  p.addr =s.paddr
And   s.sid=<> and serial#=<>;

$ kill <spid>      

WINDOWS

Select   p.spid from v$session s , v$process p
where  p.addr =s.paddr
And   s.sid=<> and serial#=<>;

Then use orakill at the DOS prompt:        
c:>orakill sid spid