Wednesday, June 25, 2014

Materialized Views

Creating materialized view that refreshes every 1 min


I have demonstrated in steps where a materialized view refresh after every one minute ,for having a mv which refresh after 5 minute use next(sysdate+1/1440)
Step1:
Create table temp (A int);
Step2:
Create Materialized view temp_mv
      refresh complete start with (sysdate) next  (sysdate+1/1440) with rowid
        as select * from temp;
Step3:
select count(*) from temp;

       COUNT(*)
      ----------
          0
Step4:
select count(*) from temp_mv;

       COUNT(*)
      ----------
          0
Step5:
begin
      for i in 1..10 loop
         insert into temp values (i+1);
      end loop;
end;
/
Step6:
commit;
Step7:
select count(*) from temp;

       COUNT(*)
     ----------
        10
Step8:
select count(*) from temp_mv;

       COUNT(*)
       ----------
          0
Step9:
select to_char(sysdate,'hh:mi') from dual;

       TO_CH
       -----
       04:28
Step10:
select to_char(sysdate,'hh:mi') from dual;

       TO_CH
        -----
       04:29
Step11:
select count(*) from temp;

      COUNT(*)
     ----------
        10
Step12:
select count(*) from temp_mv;

      COUNT(*)
      ----------
         10

Monday, June 23, 2014

Script to reset Oracle Apps frontend User ID Password

Here is a  sample anonymous PL/SQL block which will reset the Oracle Apps front end password for a given user from back end.


DECLARE
      flag_value BOOLEAN;
BEGIN
      flag_value :=
           fnd_user_pkg.changepassword(username=> 'SXMARGAM'
                                                 ,newpassword => 'welcome1');
     IF flag_value
     THEN
           DBMS_OUTPU.PUT_LINE('The password reset successfully');
     ELSE
           DBMS_OUTPUT.PUT_LINE('The password reset has failed');
     END IF;

END;
/
COMMIT;

Friday, June 20, 2014

How to add or remove the "About This Page" link on E-Business Suite Framework pages?

This document describes:-


1. How to remove the 'About this page' link from OA Framework based Self Service pages

2. How to add the 'About this page' link to OA Framework based Self Service pages

Solution

1. How to remove the 'About this page' link
In order to hide the 'About this Page' link, BOTH of the following system Profile options need to be set to a value of "No"
"FND: Diagnostics" (Short name : FND_DIAGNOSTICS) and "Personalize Self-Service Defn" (Short name : FND_CUSTOM_OA_DEFINTION)
Once these profile options have been changed, users will need to logout and re-login for the change to take effect
If after making the above changes the pages still show the 'About this Page' link, then you can take these steps to confirm the issue:-


a. Check the profile options are not set to "Yes" at any level
The profile options can be set at different levels, so need to be sure the profile option values have been changed at all levels that may effect the users

Run this script two times, once for each of the following profile values FND%Diagnostics Personalize


b. Restart Apache
If all profile options are set correctly, then restarting Apache will ensure the profile options are not cached in Apache's Java Cache


2. How to add the 'About this page' link
To enable the 'About this Page' link on OA Framework pages, you should set EITHER or BOTH of the following system Profile options to a value of "Yes"
For this purpose of enabling the 'About this page' link' it does not matter which profile option you enable, but be sure you are aware of the additional effects of the profile option you decide to enable. Review the Profile Option documentation listed in the references section below if you need explanations of these effects
You can set these profile options at different levels to effect all or some users as appropriate for your requirement
"FND: Diagnostics" (Short name : FND_DIAGNOSTICS) and/or"Personalize Self-Service Defn" (Short name : FND_CUSTOM_OA_DEFINTION)
Once these profile options have been changed, users will need to logout and re-login for the change to take effect
If after making the above changes the pages still do not show the 'About this Page' link, then you can take the same steps described above to investigate the issue

Monday, June 9, 2014

Setup user as a worker to access Purchase Order form


Following is the common note shown by application while normal user trying to access Purchase Orders form.
"You are not setup as a worker. To access this form you need to be a worker."


Follow below steps to setup user as worker/buyer.

1. Navigate to Human Resources->People->Enter and Maintain
Provide all mandatory details in People form.
Select Person Types as Employee(Use Action lov to get this)
Save the changes.

2. Navigate to Purchasing->Setup->Personnel->Buyers
This opens Buyers OA page.
Click on Add Buyer button and add the person created in last step as a Buyer.
Save Changes.

3.Navigate to System Administrator->Security->User->Define
It opens Users form.
Query your preferred user details.

Add person created in the previous steps to this user.
Save Changes.

4.Navigate back to Purchasing->Purchase Orders->Purchase Orders
Now application allow you to see Purchase Order form with out any notes.

Friday, June 6, 2014

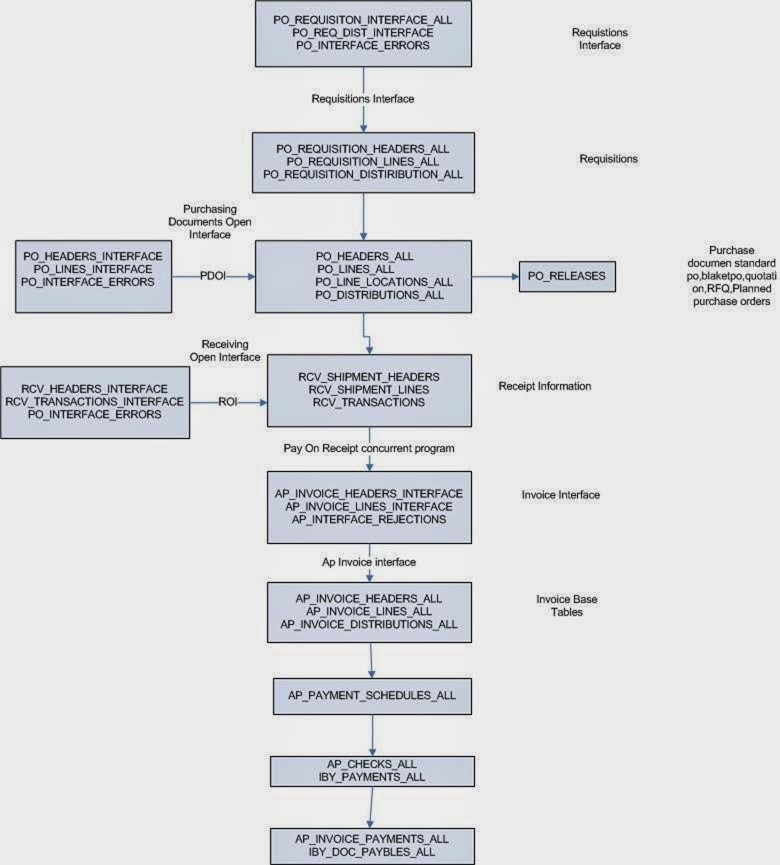
Procure to Pay (P2P) Function and Technical Flow


Diagrammatic representation of Procure to Pay cycle.


First let’s see what the heading itself means? Procure to Pay means Procuring Raw Materials required to manufacture the final or finished Goods to Paying the Supplier from whom the material was purchased. But this is not just two steps. It involves many steps. Let’s see the steps and Oracle Application involved in performing those steps.
  1. Oracle Purchasing: You enter Suppliers of different materials and products you want to purchase to manufacture a finished good that your organization plans to sell.
  2. Oracle Purchasing: You prepare a Request for Quotation (RFQ) and send it to different suppliers to get the best and/or economical price for the product.
  3. Oracle Purchasing: Suppliers sends their quotations and you upload those quotations in Oracle Purchasing to get the best three quotes and further to get the one best quote.
  4. Oracle Purchasing: You prepare a Purchase Order(PO) against the best RFQ to buy the goods from the supplier who quoted the suitable price and sends the PO to that supplier
  5. Oracle Purchasing: The supplier receives the confirmation of purchase from PO and ships the ordered goods. You receive the goods enter aGoods Received Note (GRN) in Oracle Purchasing.
  6. Oracle Inventory / Oracle Assets: It’s up to you whether you want to receive the goods at your head office or you Inventory directly. In either case you move the received goods to your different Raw Material Inventory from Oracle Purchasing to Oracle Inventory and the Item Count increases. If the item is Asset Type then it will move to Oracle Assets at the time of Invoice creation in Oracle Payables.
  7. Oracle General Ledger: Once you move the goods to Oracle Inventory, it sends the Material Accounting to Oracle General Ledger.
  8. Oracle Payables: After this the supplier sends you the invoice for the purchased goods and you Enter or Match the invoice against the PO from Oracle Purchasing in Oracle Payables. As said before, if the item is Asset in nature then it will move to Oracle Asset.
  9. Oracle General Ledger: When you enter the invoice it means that you have created a Liability against that supplier and also you have recorded the expense incurred or asset purchased. Oracle Payables sends the invoice accounting to Oracle General Ledger.
  10. Oracle Payables: You pay the invoice and settle the Liability.
  11. Oracle General Ledger: The liability is settled and your cash movement account is updated.
  12. Oracle Cash Management: As you pay the invoice Oracle Payables sends the payment information to Oracle Cash Management for Bank Reconciliation. Once reconciled, Oracle Cash Management sends the updated Bank/Cash accounting entry to Oracle General Ledger.
  13. Oracle General Ledger: Your cash at bank is updated with actual balance.
  14. Oracle Process Manufacturing(OPM) / Oracle Discrete Manufacturing(ODM): You start the manufacturing of your final product. Both OPM or ODM requests the different raw materials from your inventory organizations and manufactures a finished good.
  15. Oracle Inventory: As the raw materials are issued to OPM and ODM the inventory sends the issuing material accounting to General Ledger and decreases the Item Count from the Raw Material Store. As the finished good is prepared, Oracle Inventory receives the finished good in Finished Good Store and increase the Item Count. 
Now the final product is ready to be sold in the market.

Oracle Procure to Pay Functional Flow

Stage 1: Choosing an Item

Let us choose an item to be procured in our example. 
Go to Purchasing Responsibility and follow the below navigation to check for the suitable item.


The item picked for our example should be purchasable item as above. Click on tools and choose “Categories” to view the below screen.


Stage 2: Creation of Requisition

Follow the below Navigation to reach Requisition Form. 


Create a new Requisition for the item viewed in Stage 1.


Click on Distributions to View the charge Account.


Save and Submit for Approval


Now note down the Requisition number and open the “Requisition Summary Form” to view the status of it. For our Example, Requisition number is: 14855

Stage 3 : Checking the Status of Requisition


 Query for the Requisition Number and click Find.


 Here for our example purpose, I kept the submitted and approved person has same and hence it shows the status as approved.


 To see the approval status, please follow the below navigation. 


Stage 4 : Creation of Purchase Order

For creating a Purchase order, let us use the “Autocreate Documents” Form. Follow the below Navigation

 Query for the Requisition


 Click on Automatic as shown in the above figure to create a Purchase Order

  
Click on “Create” button to create a Purchase order


 View the shipment screen to change the “Match Approval Level” to “2-Way”.

Click the “Receiving Controls” to make sure that the “Routing” is made as “Direct Routing”


 Click Save and submit for Approval.


 Note down the PO Number.
  
Stage 5: Creation of Receipts


Query with the Purchase order created in the above stage.


 Check the check box near to the lines that are received and click save.

  
Click the “Header Button” to view the Receipt Number.


Stage 6: Checking the On Hand

 Go to any Inventory Responsibility and follow the below Navigation


 Query for our Receipt and make sure the Organization is the same as we received.


 Below screen will show that our inventory has been increased by 5 quantities.


Stage 7: Check the Material Transactions

Follow the below Navigation to reach “Material Transactions” Form

 Query for the item and date as below


 Below screen shows the source and transaction Type

 Below screen shows you the Serial Numbers of the items received.

  
Stage 8: Creation of Invoice

Navigate to any Purchasing Responsibility and view à Requests 
Submit the below requests by providing the Receipt number as Parameter to create an invoice.


 Check the status of the program.


Stage 9: Checking the Invoice

Change to any Payables Responsibility and open the invoices Form.

Query for the Purchase order as below,


 Click “Actions” Button then tick the “Validate Check Box” and press “Ok” to validate the invoice

  
Below screenshot will give you the status of the invoice

  
Stage 10: Creation of Accounting and Payment

Once invoice got approved, we can “Create Accounting” and “Create Payments” via “Action” Button in the “Invoice Form” as we validated the invoice.


Oracle Procure to Pay Technical Flow